Lemon curd bars with fresh raspberries

Greetings! It will be quiet in my little corner for the next couple of weeks as we are off on a trip to Scotland and Ireland, so let me leave you with a sweet treat.

These lemon bars are one of my favorite things to make and I get requests for them often, I should warn you that they are quite tart which is how I like things. If you’re more on the sweet side of things just up the sugar in the lemon curd. Also, the lemon curd is fabulous on it own.

Sorry that I forgot to take more (and better) pictures, but trust me, if you love lemons like I do, these bars are for you.

Lemon Curd Bars with Fresh Raspberries

For the curd:

  • 1/2 cup sugar (more if you’d like it sweeter)
  • 3 large eggs
  • 3 large egg yolks
  • 3/4 cups freshly squeezed lemon juice
  • zest of 1 lemon (optional)
  • Large pinch of salt
  • 1 stick cold unsalted butter cut in to cubes

For the crust (I use a recipe from David Lebobitz):

  • 1 cup flour
  • 1/4 cup sugar
  • 1/4 teaspoon salt
  • 1 stick unsalted butter, melted
  • 1/2 teaspoon vanilla extract

For assembly:

  • 1-2 pints of fresh raspberries

Set a fine mesh strainer over a bowl and set aside

In a separate bowl whisk together the whole eggs, egg yolks and sugar. Slowly mix in the lemon juice and zest if using.

Add lemon juice mixture to a medium saucepan and cook over medium heat, stirring slowly, but constantly until the mixture has thickened to a consistency similar to a custard or pudding, about 5-10 minutes. (You will thing this is never going to happen and then all of a sudden it will thicken).

Once the mixture has thickened pour it through the strainer to get out any bits of cooked egg.

Whisk butter and salt in to lemon mixture  set aside

Preheat oven to 350. Cover an 8×8 square baking dish with foil and lightly butter foil.

In a medium bowl mix all crust ingredients until smooth. Smooth the batter in to the baking dish as evenly as possible.

Bake the crust for 20-25 minutes until it is a deep golden brown.

Remove crust from oven and lower oven temperature to 300.

Pour the curd over the crust, spreading it out evenly, then put the bars back in the oven and bake for 10 minutes.

Remove the bars from the oven and start decorating with the raspberries. I like to place them in rows, with the closed end up about half an inch apart.

Refrigerate at least 2 hours or up to overnight.

Enjoy!

IMG_4873

IMG_4877

Z is for… Zambia, The end is here!

Hello!

Flag of Zambia

Flag of Zambia

It’s finally over! After some triumphs and plenty of bumps, I’ve finally reached my final alphabetical international recipe.

There are only two countries in the world that start with Z, Zimbabwe and Zambia; both in Africa and bordering each other in the southern part of the continent. Finding something to cook from either country was a challenge since both cuisines rely heavily on peanuts, which I’m deathly allergic to so I was delighted when I stumbled on a few mentions of Golabjamoun, a fried sweet potato treat from Zambia.

Traditionally Golabjamoun are fried in peanut oil, which I obviously needed to find a substitute for. Though olive oil isn’t the best of oils for frying, since the end of my 26 Dishes project coincided with the end of Hanukkah and it’s traditional to use olive oil on the holiday, I decided to go that route.

I couldn’t find many recipes for Golabjamoun and those that I did weren;t very detailed (“mix ingredients then fry until done”) so there was a bit of guess work here. Still this was an incredibly easy recipe and my only mistake was not realizing that they were meant to be deep fried and instead shallow fried them in a pan. Oh well, I’ve certainly messed up worse during the 26 Dishes project…

Golabjamoun

  • 1lb (about 2 medium) sweet potatoes; peeled and diced
  • 1 cup whole milk
  • 1/2 cup flour
  • 1/4 cup sugar
  • 2 teaspoons cinnamon (or more to taste)
  • Oil for frying

Place sweet potatoes and milk in a medium pot set over medium-high heat. Bring milk to a boil, then turn heat down to medium, maintaining a steady boil until the potatoes are very soft and milk has mostly evaporated; about 10-15 minutes (this will largely depend on how small you cut your potatoes).

20131209-161310.jpg

Transfer to a mixing bowl and mash the sweet potatoes in to any remaining milk until smooth. Allow to cool slightly.

When mixture is cool enough to handle,  add the flour, sugar and cinnamon and stir until fully incorporated.

20131209-161625.jpg

Heat the oil in a frying pan (or dutch oven with thermometer if deep frying). Take a bit of mixture in your hand and shape in to balls about 1 inch big, wetting hands between each and place in the hot oil.

20131209-161638.jpg

Fry until brown, flipping half way through, about 5 minutes a side.

20131209-161655.jpg

Place the finished Golabjamoun on a paper towel lined plate.

Yields 14-16 Golabjamoun

FINAL VERDICT: B

Chris and I both thought the Golabjamoun were quite tasty and perfect for this season as the cinnamon was very prevalent. I had some left over cranberry sauce so I served that on the side and it paired really well.

I would definitely make these again. I have a feeling that boiling these in milk is kind of unnecessary and instead you could just use left over baked sweet potatoes. Perhaps this could be a great Thanksgiving leftover recipe.

I do think these would’ve been a bit better had they been deep fried, but all in all they were still delish.

20131209-161211.jpg

So good with cranberry sauce!


Bon Appetit!

Stay tuned for the announcement of my next project, coming soon…

Noodle Kugel

So I promised you a noodle kugel recipe, didn’t I?

First, for you non-Jews out there, what the heel is a kugel anyway? Well, according to Wikipedia; “Kugel is a baked Ashkenazi Jewish pudding or casserole, similar to a pie, most commonly made from egg noodles (Lokshen kugel) or potatoes, though at times made of zucchini, apples, spinach, broccoli, cranberry, or sweet potato.” I’d say that’s a pretty accurate description except for the thing about pie. Kugel is nothing like pie.

Though, as Wikipedia mentions, kugels can be made with a variety of things, most commonly kugel refers to the potato or noodle variety. The potato version, which everyone loves except me, is always a savory dish; whereas the noodle version straddles the line between sweet and savory. Though noodle kugel is a sweet dish, often making use of things like raisins and cinnamon, it’s commonly served at brunches alongside bagels and things.

The version my family makes is from a recipe given to my grandmother by a friend back in Brooklyn and as far as I’m concerned it is the best noodle kugel around. I’m not planning on making another one anytime soon so forgive that I’m recycling the photos I took when I made a noodle kugel for Mandy and her mom.

That's Mandy's kitchen, not mine.

That’s Mandy’s kitchen, not mine.

Noodle Kugel

  • 5-6 oz medium egg noodles (I usually eyeball this)
  • 1 cup sour cream
  • 16 oz pot cheese (or low fat cottage cheese)*
  • 3 eggs
  • 1 cup sugar
  • 2 Tablespoons fresh lemon juice
  • 1 teaspoon vanilla
  • 1/4 cup butter
  • 1 sleeve of cinnamon graham crackers* crushed in to crumbs.
Hot out the oven!

Hot out the oven.

Preheat the over to 350 and grease an 8×8 baking dish.

Cook noodles per package directions.

Meanwhile, mix together all other ingredients except for the butter and graham cracker crumbs.

When the noodles have finished cooking, drain them and then add to cheese mixture.

Pour the noodle in to your greased pan. Mixture will be quite loose.

Melt the butter in a small bowl and then mix with the graham cracker crumbs. Cover noodle mixture with buttered graham cracker crumbs.

Bake at 350 for 35 minutes.

Allow to cool to room temperature. Serve.

Yields 8-10 servings

Yum!

Yum!

Cooks Notes:
* Pot cheese is often labeled pot style cottage cheese. If you can’t find that use a reduced fat (NOT non-fat) cottage cheese as it will be thicker.

*You guys get what I mean by “sleeve,” right? Like you buy a box of graham crackers and it comes with 3 separate plastic packaged sleeves inside of it. Use one of those.

This is a dish that reheats extremely well. For individual servings I suggest just cutting yourself a square and then microwaving it for 10-20 seconds just to bring it up to room temperature.

Enjoy!

Cheesecake mousse with orange curd and raspberry sauce

Last Monday night was the start of Passover and the first of the two Seders  the festive meals and retelling of the Passover story. I’m sure I’ve mentioned this before, but Passover is my favorite holiday for 3 major reasons, it involves lots of food, storytelling/singing and has a heavy emphasis on social justice. Yea, pretty much all of my favorite things rolled in to one holiday.

I celebrated the first Seder at the home of my friends Ruth and Adam with several other adults and one very cute 2.5 year old who happens to belong to Ruth and Adam. I volunteered to provide the desserts, since I’d already planned on bringing a chocolate covered matzah cake. For the second dessert I considered making a crust-less cheesecake because it’s Ruth’s favorite dessert, but I didn’t know if I could pull it off in my NYC apartment sized mini oven.

Since all traditional cakes and cookies would violate the dietary restrictions of Passover I was struggling and so I revisited the cheesecake idea, but somehow got it in my head to Google, “cheesecake mousse,” and bam! Victory! Such a thing actually does exist.

all

I used a recipe from Oprah Magazine which was said to serve 6. Since there were to be 8 of us I one-and-a-halved (is that English?) the recipe. That was my only mistake. It literally made enough for like 12 people! Luckily Ruth and Adam were happy to keep the leftovers.

Rather than make the gelee that the recipe suggests I decided to serve the mousse topped with Cara Cara orange curd because OMG I love curd and a raspberry sauce for add a bit of tartness to balance the dessert.

Cheesecake Mousse

Recipe adapted from Oprah magazine

  • 3 cups heavy cream
  • 24 oz whipped cream cheese
  • 1 cup powdered sugar
  • 1.5 teaspoons lemon juice
  • 1.5 teaspoons vanilla extract
  • 1 tsp salt

Place a metal bowl and the beater attachments from your handheld mixer in the freezer until very cold. I like to put them in the night before.

Remove from freezer, pour in cream and beat  until stiff peaks form, then cover and refrigerate.

Meanwhile, clean off the beaters and in a separate bowl beat the cream cheese and confectioners’ sugar until combined. Add the lemon juice, vanilla, and salt and continue to beat until light and fluffy.

Using a rubber spatula, mix in 1/3 of the whipped cream. Fold in the remaining whipped cream, making sure to keep the mixture light and fluffy.

Cover with plastic wrap and refrigerate for several hours.

When ready to serve spoon in to individual ramekins and top with orange curd (I doubled this recipe) and then a dollop of raspberry sauce.

Yields enough to feed an army.

one

Dulce de leche brownie bars

I’m not a huge chocolate person. No, that doesn’t mean that I hate chocolate. I don’t mind chocolate and I think it can make a nice accompaniment to things, I just don’t get what all the hype is about. Since there were a few chocoholics at our Thanksgiving table though, I thought it only right to make a chocolate dessert. I decided on dulce de leche brownie bars.

They were a huge hit with everyone at the table and I will definitely be making these again. Though they take some time they’re actually really easy to make and they can be made several days ahead. The hardest part of the whole process is cutting them in to squares.

This recipe is adapted from the Grasshopper Squares recipe from Gourmet magazine (which I also plan on making at some point because I do love mint with chocolate). Enjoy!

Dulce de leche brownie bars

Brownie layer

  • 6 Tablespoons unsalted butter
  • 5-6 oz good quality semisweet chocolate chips (I just eyeball half the bag)
  • 3/4 cup packed brown sugar
  • 1 large egg plus 1 egg yolk; lightly beaten
  • 1 teaspoon vanilla
  • 1/4 cup plus 2 Tablespoons flour
  • 3 Tablespoons unsweetened Dutch-process cocoa powder
  • Large pinch of salt

Preheat oven to 375°F. Lightly butter an 8×8, then line completely with foil leaving a 2 inch overhang on all sides. Butter foil.

Melt butter and chocolate with brown sugar in a small saucepan over medium heat, stirring occasionally, until smooth. Remove from heat.

Whisk eggs and vanilla in to chocolate mixture until combined. Then whisk in dry ingredients until just combined.

Pour batter in to foil lined pan as evenly as possible and bake 15-20 minutes until a toothpick inserted in the center comes out with moist crumbs.

Allow to cool completely. Store in refrigerator.

Dulce de leche

  • 14 oz can sweetened condensed milk

Peel the label off of your can (only so it doesn’t make a mess in your pot). Place sealed can in a deep pot and cover with water. Bring to a boil and allow to boil for 2 hours making sure the water never dips below the can and adding more boiling water when necessary.

It is very important that the water not dip below the can because the pressure of this can cause the can to explode, which is not only messy, but dangerous. I suggest keeping a kettle of simmering water next to the pot to add when needed and check every once in awhile. Remember that the deeper your pot the better.

After 2 hours, gently dump the water and can in the sink (I usually do this through a colander to give the can a softer landing). Allow to cool until you are able to handle the can, but contents is still warm, which will take a few hours.

Pour warm dulce de leche over chilled brownies and smooth with an offset spatula. Chill completely in refrigerator.

Chocolate ganache

  • 5-6 oz good quality semisweet chocolate chips (ie the other half of the bag)
  • 1/2 cup heavy cream

Put chocolate chips in mixing bowl and set aside.

In small saucepan bring cream to a simmer.

Pour cream over chips and allow to stand one minute, then whisk until smooth.

Allow to cool slightly until ganache is still warm, but manageable. Pour over completely chilled dulce de leche layer and smooth with offset spatula.

Cool completely in the refrigerator.

Cutting, serving and storing

Once brownies have completely cooled remove them from pan by picking up the the foil overhang. Peel the foil from the brownies.

Run a long sharp knife under hot water and wipe dry. Cut brownies in to squares continuing to heat and dry the blade as necessary. This will take some serious upper body strength.


Remove from refrigerator a few minutes before serving.

Brownie bars can be stored layered between sheet of wax paper in an airtight container in the refrigerator for up to two weeks.

Yields 12-16 bars

P is for… Peru. Feliz Año Nuevo!

¡Hola

Flag of Peru

I can’t believe it’s been so long since I’ve blogged. It’s been an incredibly busy couple of weeks and every time I sit down to write I’m just too tired to even think.

One of the things that have kept me so busy is the Jewish High Holidays.  Two weeks ago we  celebrated Rosh Hashanah, the Jewish New Year, and last week we celebrated Yom Kippur.

During Rosh Hashanah it’s traditional to eat sweet things to represent our wishes for a good and sweet year to come so this seemed like a perfect time to make Encanelado, Peruvian cinnamon cake filled with dulce de leche.

Making this cake presented quite a challenge, not because it was all that difficult to make, but because recipes were so hard to find and not very specific. I could only find two recipes in English. The majority of recipes were in Spanish so I translated a few more using Google Translate. As I said though, none of these recipes were very specific saying things like, “pour batter in to a rectangular or square pan” so there was a lot of finger crossing and educated guesses involved in making this cake.

First off was the making of the dulce de leche which I had heard could be sort of dangerous. Truthfully, it’s incredibly simple using the boil in can method and as long as you ALWAYS make sure the can is covered with water you’ll be fine. The most dangerous part for me was reminding myself that I needed the dulce de leche for the cake  and couldn’t just eat it right out of the can with a spoon.

You know you want me!

The next day, pre-made dulce de leche in hand, I arrived at my parents house ready to make the rest of my cake. It’s so nice to cook in a real kitchen… sigh… I digress…

All of the recipes I found were very similar and I was surprised by the high egg to flour ratio, but in my quest to keep these recipes fairly authentic I went with it. My one adjustment to the cake was that where the recipe called for a shot of Pisco, a Peruvian brandy, I replaced it with White Tequila. The Pisco is used to make a syrup that you drizzle on the cake, but the Tequila worked just as well and it made no sense to go buy an entire bottle of Pisco.

The role of Pisco is now being played by White Tequila.

After you make the cake and cool it you’re supposed to slice it in half lengthwise and fill it with the dulce de leche. I have no idea if the “rectangular pan” I chose, a 13×9 was too big or if I should’ve changed that strange egg to flour ratio, but the cake never grew higher that an inch so I made an adjustment and sliced the cake in half vertically.

Despite all this the cake still turned out to be a great way to ring in a good and sweet new year.

Are you there God? It’s me, Encanelado. How come I’m so flat? Why can’t I be like all the other cakes at school?

Encanelado

For the cake:

  • 6 eggs
  • 1 cup sugar
  • 1 1/2 cups flour
  • 1 teaspoon baking powder
  • Large pinch of salt
  • plenty of cinnamon for dusting

Preheat oven to 350. Butter and flour a 13x9in pan or line with parchment paper.

Beat eggs until fluffy, add sugar.

In separate bowl sift together the flour and baking powder then add salt. Add the dry ingredients to the eggs and gently stir to incorporate.

Pour into greased pan and bake at 350 for 20-25 minutes or until a cake tester comes out clean. Let cool completely

For the syrup:

  • 1 cup water
  • 1 cup sugar
  • 1 shot Pisco (or other strong clear alcohol such as White Tequila or Grappa)

In small sauce pan mix together sugar in water. Bring to a boil making sure sugar is dissolved. Add Pisco and simmer for 10 minutes. Allow to cool completely.

For the filling:

  • 1 can dulce de leche

Use boil in can method mentioned above or another method if you prefer. I believe you can also buy this premade.

To assemble:

Once cake has cooled completely slice in half lengthwise or, if your cake is flat like mine was, vertically.

Soak bottom layer with half the syrup then cover with all of the dulce de leche. Cover with the top layer.

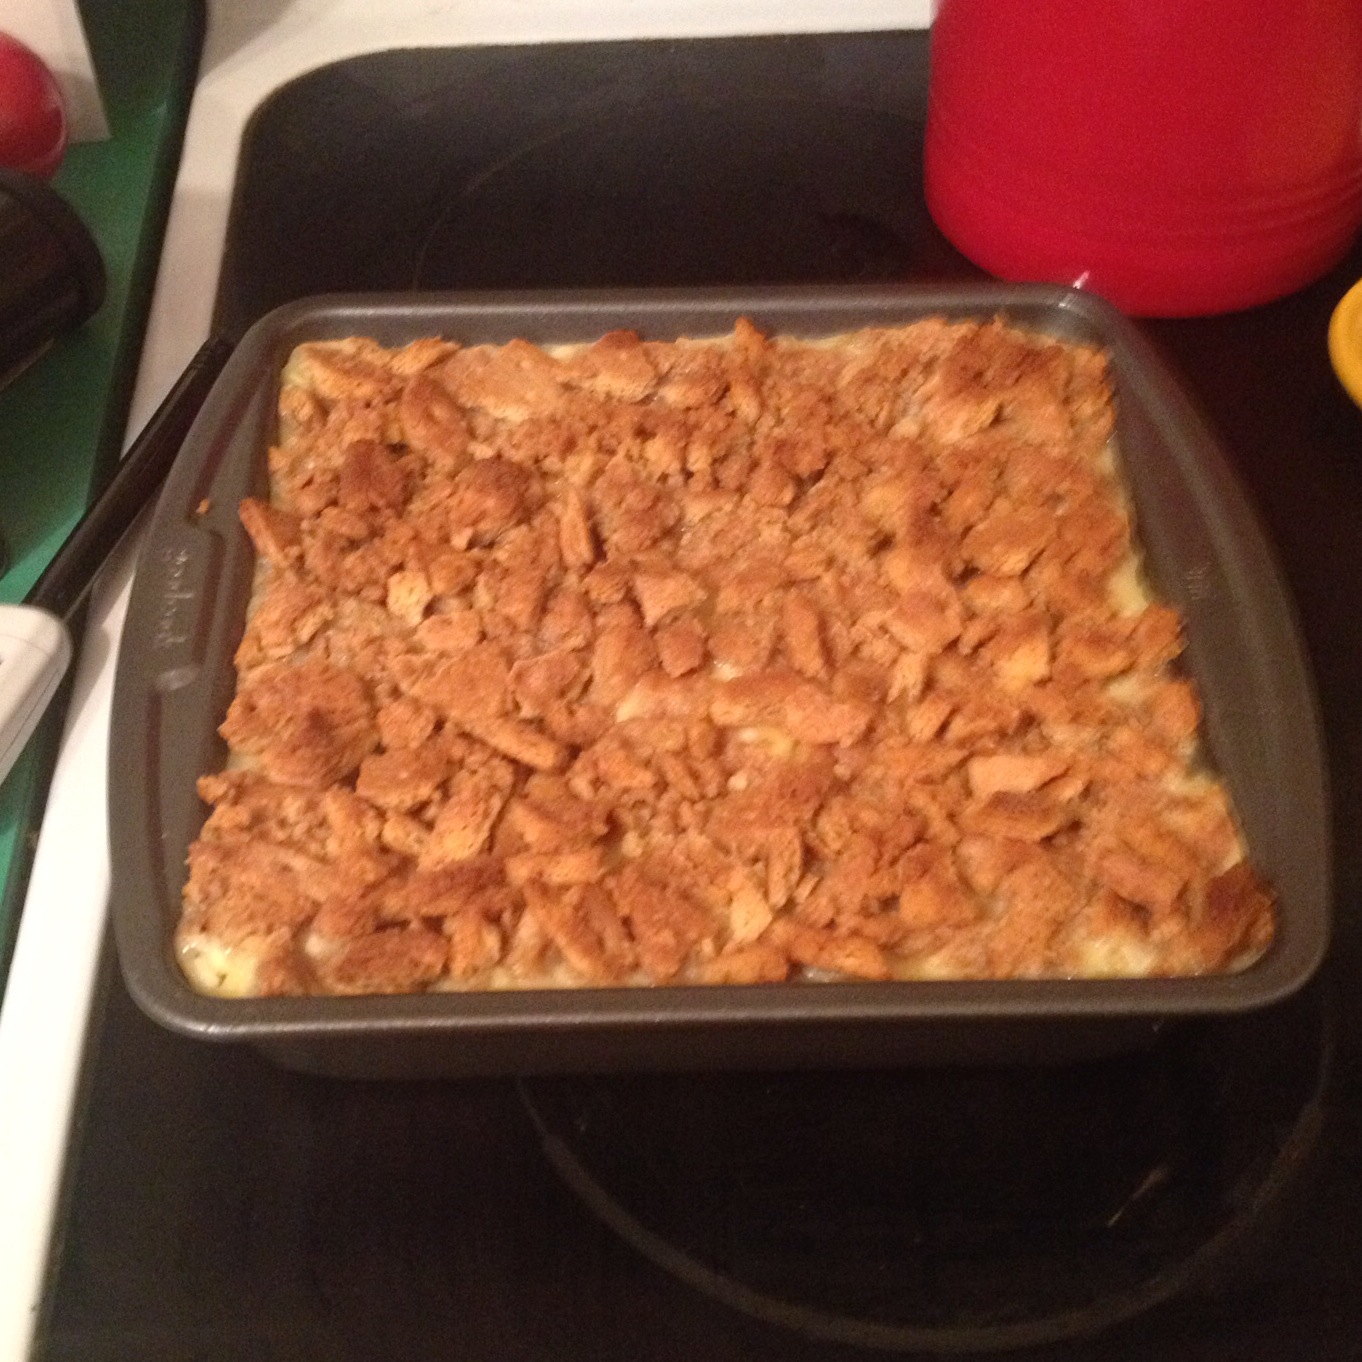
Pour the remaining syrup over the top layer than dust completely with cinnamon.

Serves 10-12

Yea, I’m flat, but I know how to work it.

FINAL VERDICT: B

This was a tough grade to come up with as my family all agreed that this cake had some textural issues, but the flavor was great.

The flat as a board cake wasn’t bad, but it was coarse and a bit dense. The bites where the syrup really soaked in where the best as they softened up the cake. The flavor however saved this cake. Dulce de leche and cinnamon are just natural partners, kind of like Luke and Lorelai (woot woot, Gilmore Girls reference there!). So the flavor was great and the dulce de leche just gave everything a decadent quality.

I will definitely be making this cake again because I’m determined to get it right. A taste that good deserves an equal partner in texture. I think I’ll just make a basic white cake next time or even experiment with cupcakes… cinnamon whipped cream topping anyone?

¡Buen provecho!

L is for… Latvia; Grandmother Approved

Sveiki

Flag of Latvia

My grandmother came to America as a refugee from Nazi Germany at age 13. As one might imagine she as well as my great grandparents and my grandfather, who was also a German Jewish refugee, had no love loss for Germany, but still there were some foods from their youth that they enjoyed from time to time. Though I wouldn’t say I grew up with an abundance of German food, we did dine on it from time to time and I enjoyed it except for that dark, almost black, rye bread that’s so ubiquitous in Northern Europe.

Everyone in my family loves that dark rye which is dense and coarse and has almost a moist quality to it, but I’ve just never developed a taste for it. Even after living in Denmark, where their black bread is considered so flavorful that Oprah herself fell so in love with it after a visit and had several loaves shipped to her back home, I still didn’t become a fan. When I found this recipe for Rūpjmaizes Kārtojums, Latvian rye bread trifle I was intrigued then when it turned out that I would be up to “L” just when my grandmother, who I adore, was coming for a visit I knew it was meant to be!

My grandmother adores all of her grandkids, but I’m her only girl so we have a special relationship (and by special I mean I’m the clear favorite ;)). My grandma cooked because she had to and not because she wanted to. She and my grandfather raised 2 kids in a one bedroom apartment on a delivery man’s salary so she wasn’t exactly filled with a desire or the ability to get creative in the kitchen. Nonetheless she was a pretty good cook, but she is endlessly fascinated and proud at my love and ability in the kitchen so cooking for her is always a pleasure.

Me and Grandma, then and now.

This is very much a “to taste recipe,” and, since my family doesn’t like very sweet things, I went light on sugar and didn’t sweeten the cream at all. In my research I learned that the dessert was traditionally made with ligonberries or cranberries, but is now commonly made with whatever you have on hand. Since raspberries are plentiful at the farmers market that’s what I went with. If you make this yourself you can sweeten the cream to your taste and use whatever fruit preserves you like. Make sure to use the darkest German rye bread you can find or use German pumpernickel as I did.

Rūpjmaizes Kārtojums

  • 5-6 slices of day old dark German style rye (or pumpernickel) bread grated or crumbled
  • 1 Tablespoon butter
  • 1 Tablespoon sugar
  • 2-3 teaspoons of cinnamon or to taste
  • Quick raspberry jam (recipe follows) or store bought preserves
  • 8-10 ounces very cold cream
  • 1-2 teaspoons vanilla or to taste

Place a metal bowl and the beaters from your handheld mixer in the freezer until very cold.

In medium skillet over medium high heat melt butter then add the bread crumbs, sugar and cinnamon; stirring to coat and cook until toasted, 3-5 minutes being careful not to burn the crumbs. Let cool to at least room temperature and set aside.

Meanwhile make the whipped cream. Take your bowl and beaters from the freezer and pour your cream in. Beat to medium peaks. Add the vanilla and beat to stiff peaks.

In a glass bowl, trifle dish or individual glasses or ramekins place a layer of rye crumbs, then a whipped cream and finally a layer of raspberry jam. Repeat until ending with a layer of crumbs, dollop of whipped cream and drizzle of jam.

Refrigerate at least 2 hours.

Serves 6

Quick Raspberry Jam

  • 2 pints raspberries
  • 2 Tablespoons sugar
  • Juice of half a lemon

Combine all ingredients in a small sauce pan and smash the raspberries a bit with a spoon. Bring to a boil over medium high heat then reduce heat to low and simmer for 15 minutes.

Cool completely before using.

This will be fairly tart so add less lemon and more sugar if you want it sweeter.

FINAL VERDICT: A+

That’s right kids, my first A+ was made with an ingredient I usually hate.

My grandmother exclaimed, “It’s delicious and not too sweet.” “Not too sweet,” is a huge compliment in my family. My dad declared, “This is reeeeaally good,” and my mom instructed, “Al, this has to be and ‘A’ recipe,” unaware that I would even consider giving out an A+. The next day when I spoke to my mom on the phone (we do that every day, adorbs no?) she said, “That was so good, I must get the recipe from you!”

So in case you haven’t guessed yet, I loved this dish. I am so much more of a savory eater than a dessert eater, as is my whole family, so I’m shocked that my first A+ is for a dessert, but this recipe was perfect. I will definitely make this again and will not change one thing!

Yes, I’m so ghetto that I put this in tupperware. Don’t judge!

Labu Apetīti!

The Pudding Pledge (Salted Butterscotch Pudding)

Dear Readers,

I invite you to take the following pledge with me.

OK raise your right hand:

I (insert name), being of sound mind, do solemnly swear that I will never buy pudding in a plastic cup or powdered box mix again. I hereby acknowledge that making pudding from scratch is incredibly easy and with very little work I will create something that is far superior in flavor and texture to prepackaged pudding and pudding mixes.

Seriously, once you start making pudding from scratch you will wonder why you ever bought it pre-made before. One of my favorite recipes of all time  is the butterscotch pudding recipe from the no deceased Gourmet Magazine (RIP, may its memory be a blessing to generations of foodies). It’s not overly sweet like butterscotch puddings you may have had in the past; rer it has a deeper, more complex almost caramel like flavor. It’s a tried and true recipe, but after having that amazing experience at Sweet Cheeks in Boston, where they topped their pudding with salted caramel, I decided to attempt a salted version of Gourmet’s butterscotch pudding.

Salted Butterscotch Pudding

  • 1/2 cup dark brown sugar; tightly packed
  • 2 Tablespoons plus 2 teaspoons cornstarch
  • 1/4 to 1/2 teaspoon Fleur De Sel
  • 1 1/2 cups whole milk
  • 1/2 cup cream
  • 2 Tablespoons SALTED butter
  • 1 teaspoon pure vanilla extract

In heavy bottomed medium pot whisk together sugar, cornstarch and Fleur De Sel. Then whisk in milk and cream.

Hey, who you calling heavy bottomed!

Bring mixture to a boil over medium heat; whisking frequently. Then boil for one minute; whisking constantly.

You can see and feel the pudding thicken up.

Remove from heat and whisk in butter and vanilla.

Pour into storage bowl or container.

Luscious

If you don’t want a skin to form, cover surface of pudding with a piece of buttered wax paper. I’m sort of skin neutral, but went skinless this time.

Skin protection, like SPF for your pudding

Chill until cold; at least 2 hours. Serve with extra Fleur De Sel sprinkled on top. Serves 4.

Extreme close up!

Tip: To determine how much salt to use, taste your butter first. Not all salted butter have the same level of salty-ness. I’d also suggest being conservative with your salt in the actual pudding since you can always sprinkle more in after the fact.

Enjoy!

I Done Gone Strawberry Crazy!

As it is my deeply held belief that strawberries are the greatest food on earth (and likely in the whole universe), I make sure to buy some every single week when they’re in season at the farmer’s market. Yesterday, at my lunchtime visit to the market, I went strawberry cray-zay! I saw those sweet smelling, luscious red, heart shaped globes of amazingness in front of me and instead of buying my usually pint of strawberries I bought a quart!

Much as I love strawberries and will happily eat them every day, as soon as I was back in my office I knew I’d made a mistake. Stupidly I hadn’t even bought rhubarb so that I could make a quick compote. I have a wedding to attend this weekend and so had no intention of baking either. What to do, what to do?

Then sitting on my couch last night watching Bravo’s Top 20 Real Housewives Reunion Moments show PBS it hit me; Strawberry Balsamic Sauce! It’s incredibly easy to make and really versatile. You can drizzle it on vanilla ice cream or scoop it on a simple pork loin. It’s also super simple to cater to your own personal tastes; add more sugar if you like it sweeter (or if your strawberries aren’t that sweet) or more vinegar if you like more of a tang.

Cooking away

Strawberry Balsamic Sauce

  • About 2 cups sliced strawberries
  • 1/2 cup sugar
  • 3 Tablespoons balsamic vinegar

Throw everything in to a pot and gently boil for about 10 minutes, stirring occasionally.

Yes, it’s that simple and so so delicous. If you’re serving it over ice cream or with pound cake I’d suggest grabbing some fresh basil, slicing into chiffonades and sprinkling on top.

Good on pretty much everything

Enjoy!

G is for… Guatemala: Ain’t Nothin’ But a Cheese Thing Baby

¡Hola

Guatemalan Flag

So the Rangers beat the Caps and are now in the Eastern Conference Finals, the final step before the Stanley Cup! Woo-hoo!  If this was football and we were watching th Super Bowl, I’d make my Game Day Chicken Quesadillas, but because Hockey has a championship decided by a series rather than a single game I don’t really have an occasion to cook . I am still making a quesadilla this week however, but it’s a veryvery different kind of quesadilla.

In this country we associate quesadillas with the Mexican version; a flour tortilla stuffed with melted cheese and a variety of other meats and veggies. The literal translation of the word quesadilla though, is actually “cheese thing,” and throughout much of Central America, including Guatemala, a quesadilla is a type of cake with cheese in the batter. 

Lake Atitlan, Guatemala

Guatemala is a country that I’m sure I’ll visit one day. My good friend Hans (of favorite cakes list fame) is from Guatemala and I’ve already informed him that he has to take me there. His family still lives there and his parents love me… well ok they only met me the one time and probably don’t remember me, but once they meet me again they’ll surely realize that they love me and be thrilled to have me staying with them, right? As a thank you I can even whip this cake up for them.

Guatemalan Quesadilla  is made using Queso Seco or Cotija cheese which is a dry crumbly Mexican cheese. Because I live in a city where I can get pretty much anything, I had no problem getting the Cotija, but if you can’t find any where you live the good people of the internet suggest using 2 parts grated parmesan and 1 part crumbled feta instead. The cheese, which is crazy good and addictive, does have a similarity to both of those cheeses, but also has this bit of sweetness to it. I would make every effort to find the Cotija before resorting to the parm/feta mix. 

Mayan Ruins

I also found in my research that this cake is just as often made with rice flour as it is with wheat. Two out of the five people who actually read this blog (I’m talking to you Erin and Lisa) are gluten free, but I have no other need for rice flour so I made the wheat flour version. If you try this with rice flour, my research suggests you use 1 3/4 cups rice flour in place of the 2 cups of wheat flour and you MUST tell me how it turns out.

Usually sesame seeds are scattered on top of this cake, but I’m seriously allergic to sesame so obviously a no-go. Other than that I believe this is a very authentic recipe.

 Quesadilla Guatemalteca

  • 1 stick of butter softened
  • 1 cup of sugar
  • 4 eggs
  • 1 cup whole milk
  • 1 cup full fat sour cream
  • 2 cups flour
  • 2 teaspoons baking powder
  • 1/2 teaspoon salt
  • 1 Cup crumbled Cotija (Queso Seco) cheese

Preaheat oven to 350 degrees. Lightly butter a 9×13 baking dish.

Cream together butter and sugar on medium speed until light and fluffy. Add eggs one at a time, beating after each addition.

Stir in milk and sour cream.

Sift flour, baking powder and salt together over the wet mixture. Stir just until incorporated, do not over mix. Fold in cheese.

Pour in to greased pan and bake at 350 for 40-50 minutes until a cake is very lightly browned and a cake tester or toothpick comes out clean

Yields: A LOT!

Of course I started cutting it before I remembered to take a picture

FINAL VERDICT: A- 

OMG this cake is so so good. I am not big on sweet, gooey, frosting heavy desserts; preferring a plainer coffee style cake and that’s exactly what this is. This cake is perfect for a cup of tea (or coffee if you’re a coffee drinker). It’s the type of thing that I could see bringing to a book club or some other afternoon activity that involves people chatting and drinking hot beverages (clearly I’ve never been to a book club). 

The texture of this cake is hard to explain. There’s a bit of texture from the cheese, though you’d never know there was cheese in it if someone didn’t tell you, which gives it a vague resemblance to corn bread yet it is super moist and buttery. I will definitely be making this again at some point. 

Mi Corazon

¡Buen provecho!